WARNING – Your system comes with a safety pin and tamper-seal tag in place. This safety pin is not to be removed until the Cable is completely installed. Read instructions completely before installing. KEEP WELDERS AWAY FROM AUTOMATIC PRESSURIZED LINES.
Installation
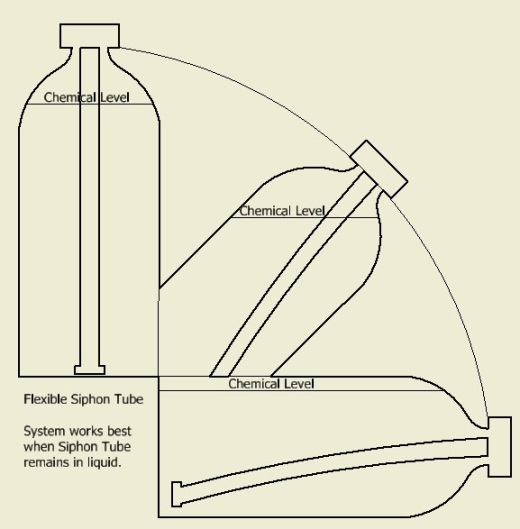
- A. Best position for all types of vehicles.
- B. Best alternative to position “A”.
- C. Satisfactory.
- D. NOT RECOMMENDED. System will not function at maximum effectiveness under extreme braking conditions.
- E. NOT RECOMMENDED. System will not function at maximum effectiveness if valve is inverted.

Cable Mounting Instructions
- Remote cables must be installed in a manner so they are protected from damage due to mechanical failure of other vehicle components or a collision.
- Be sure no bend radius is less than six inches.
- CAUTION: Protect cable from crimping or kinking.
- Be sure to use a SOLID mounting bracket for the handle as it takes a FIRM pull to actuate the system.
- The unit is shipped with a safety pin tin place to prevent accidental discharge. This pin should also be used in transporting or storing vehicle. CAUTION: When using the cable, the system will not fire when safety pin in place.
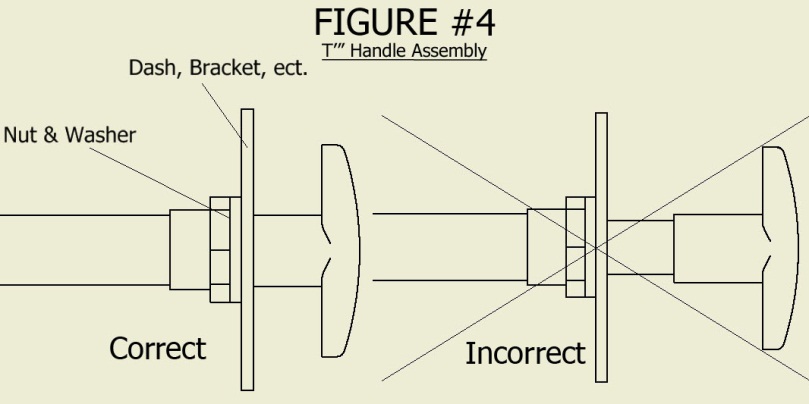
- Drill hole in dash or bracket and tread cable through hole and tighten washer and nut to the backside of dash or bracket. ( Figure #4)
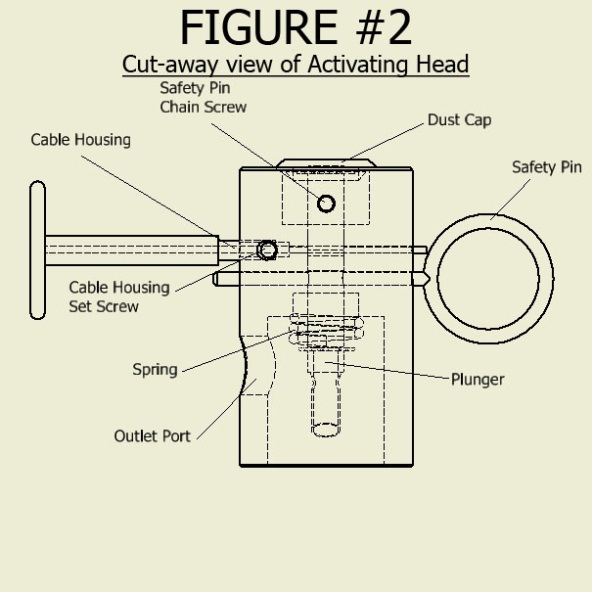
- Back out set screw so cable housing can be inserted into cable housing hole. (Figure #2)
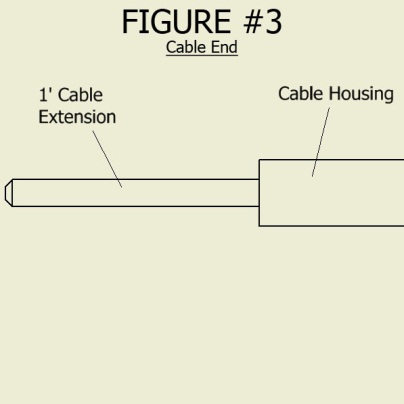
- Insert cable end (Figure #3) into cable housing hole in activating head (Figure #1). BE CERTAIN CABLE HOUSING IS COMPLETELY TO THE BOTTOM OF THE HOLE (figure # 2). Tighten screw to insure cable remains firmly attached to the activating head.
- Be certain 1″ cable extension (Figure #3) passes through the plunger (Figure #2) located in center of activating head. This can be checked by seeing if “T” handle is butted securely against cable shaft (Figure #4).
- Secure excess cable to roll cage, etc. with cable ties.
- When you are ready to “arm” the system remove the safety pin from the activating head. With pin removed pulling “T” handle will cause the system to fire. When you are ready to “Disarm” the system replace the safety pin into the activating head. With the pin in place the system will not fire when “T” handle is pulled.
- Locate (E) decal near “T” handle to determine location of fire extinguisher for safety crew.

Maintenance
- Valve assemblies and/or remote cables must be kept clean and lubricated to prevent corrosion and assure their proper function.
- Distribution tubing should be checked frequently to assure it is clear and not obstructed with dirt or other foreign material.
- Check to see that cable is firmly tightened into valve body.
Operation
- CABLE ACTIVATED MODELS: With cable installed, arm the system by removing safety pin. To activate the system, pull handle HARD! The system will discharge continuously until the bottle is empty.
- PUSH MODELS: Remove safety pin located in plunger shaft. Strike black activating knob HARD!
Recharging
- For information visit our Re-certification & Recharging page.
Retail customers are advised that automobile racing is a dangerous sport and product are subject to failure when exposed to the high stresses involved. Safety equipment is related directly to the manner in which it is installed, used, and/or maintained. The user assumes that risk. No warranty or representation is made as to the product’s ability to protect from serious injury or death, which may result from circumstances beyond our control. This limited warranty is in lieu of all other warranties, expressed or implied, and no person or representative is authorized to assume for Safety Systems Inc. any other liability in connection with the sale of Safety Systems, Inc. products.